เมื่อโปรเจกต์เริ่มซับซ้อนขึ้น
การมั่นใจว่าโค้ดมีคุณภาพดี และผ่านการทดสอบอย่างครอบคลุมก็ยิ่งสำคัญขึ้นตาม
ทั้งหมดนี้เริ่มจากคำถามง่ายๆ:
- เทสที่เขียน…ครอบคลุมพอหรือยัง?
- มี code smell แอบซ่อนอยู่ไหม?
- โค้ดที่ขึ้น production แล้ว…ยังมี bug หลุดไปอยู่หรือเปล่า?
คำตอบแบบ “น่าจะโอเคมั้ง” เริ่มฟังดูไม่น่าไว้ใจเท่าไหร่
และนั่นแหละ… ถึงเวลาที่เราต้องพึ่งเครื่องมือวิเคราะห์โค้ดอย่าง SonarQube
เพื่อช่วยจับจุดที่เรามองไม่เห็น และทำให้คุณภาพโค้ดดีขึ้นอย่างจริงจัง
ทำไมต้อง SonarQube?
SonarQube เป็นเครื่องมือวิเคราะห์คุณภาพของซอร์สโค้ด ที่สามารถรายงานได้ทั้ง
- Code Smells – โค้ดที่เขียนได้ แต่อาจทำให้เข้าใจยากหรือดูแลยากในระยะยาว
- Bugs – จุดที่อาจทำให้โค้ดทำงานผิดพลาดหรือเกิด error
- Duplications – โค้ดที่ซ้ำกันในหลายจุด ทำให้เปลี่ยนทีต้องแก้หลายที่
- Security Issues – โค้ดที่อาจเปิดช่องให้เกิดช่องโหว่ด้านความปลอดภัย
- Test Coverage – สัดส่วนของโค้ดที่ถูกครอบคลุมโดย unit tests
Simple API ด้วย Node.js พร้อม Unit Test ด้วย Jest
เพื่อให้เห็นภาพการใช้งาน SonarQube ชัดเจนยิ่งขึ้น
เราจะยกตัวอย่างโปรเจกต์ Node.js เล็กๆ ที่มี API และเขียน unit test ครอบคลุมไว้ด้วย Jest
โครงสร้างโปรเจกต์
simple-api/
├── app.js                         # โค้ด API หลัก
├── package.json                   # รายละเอียดโปรเจกต์และสคริปต์
├── sonar-project.properties       # คอนฟิกสำหรับ SonarQube
├── docker-compose.yml             # รัน SonarQube และ Sonar Scanner ด้วย Docker
├── coverage/                      # โฟลเดอร์ที่ Jest สร้างหลังรัน coverage
│   └── lcov.info                  # รายงาน test coverage สำหรับ SonarQube
└── __tests__/                     # โฟลเดอร์เก็บ unit test
    └── app.test.js                # ตัวอย่าง unit test สำหรับ API
ไฟล์ package.json
{
  "name": "simple-api",
  "version": "1.0.0",
  "description": "Simple API for testing",
  "scripts": {
    "start": "node app.js",
    "test": "jest --coverage"
  },
  "dependencies": {
    "express": "5.1.0"
  },
  "devDependencies": {
    "jest": "30.0.2",
    "supertest": "7.1.1"
  }
}
ไฟล์ app.js
const express = require('express');
const app = express();

// Mock users data
const users = [
  { id: 1, name: 'Teera' },
  { id: 2, name: 'Tee' }
];

// GET /users
app.get('/users', (req, res) => {
  res.json(users);
});

const PORT = process.env.PORT || 3000;
if (require.main === module) {
  app.listen(PORT, () => console.log(`Server running on port ${PORT}`));
}

module.exports = app;
ไฟล์ __tests__/app.test.js
const request = require('supertest');
const app = require('../app');

describe('GET /users', () => {
  it('should return list of users', async () => {
    const res = await request(app).get('/users');
    expect(res.statusCode).toBe(200);
    expect(res.body).toEqual([
      { id: 1, name: 'Teera' },
      { id: 2, name: 'Tee' }
    ]);
  });
});
รัน Unit Test พร้อม Coverage Report
npm test
ผลลัพธ์ควรขึ้นประมาณนี้
> [email protected] test
> jest --coverage

 PASS  __tests__/app.test.js
  GET /users
    √ should return list of users (132 ms)

----------|---------|----------|---------|---------|-------------------
File      | % Stmts | % Branch | % Funcs | % Lines | Uncovered Line #s
----------|---------|----------|---------|---------|-------------------
All files |      80 |       75 |      50 |   88.88 |
 app.js   |      80 |       75 |      50 |   88.88 | 17
----------|---------|----------|---------|---------|-------------------
Test Suites: 1 passed, 1 total
Tests:       1 passed, 1 total
Snapshots:   0 total
Time:        3.754 s
Ran all test suites.
และจะมีโฟลเดอร์ coverage/ ถูกสร้างขึ้นโดย Jest
โดยเฉพาะไฟล์ coverage/lcov.info ที่เราจะใช้กับ SonarQube ในขั้นถัดไป
ติดตั้งด้วย Docker
เพื่อความสะดวก เราจะใช้ Docker Compose ในการรันทั้ง SonarQube และ Sonar Scanner แบบแยก service
ไฟล์ docker-compose.yml
services:
  sonarqube:
    image: sonarqube:community
    container_name: sonarqube
    ports:
      - "9000:9000"
    environment:
      - SONAR_ES_BOOTSTRAP_CHECKS_DISABLE=true
    volumes:
      - sonarqube_data:/opt/sonarqube/data

  sonar-scanner:
    image: sonarsource/sonar-scanner-cli
    container_name: sonar-scanner
    volumes:
      - .:/usr/src
    working_dir: /usr/src
    command: sonar-scanner

volumes:
  sonarqube_data:
เริ่มจากการรัน SonarQube server ขึ้นมาก่อน
docker compose up -d sonarqube
แล้วเข้า http://localhost:9000
login ด้วย admin / admin (ระบบจะให้เปลี่ยนรหัสผ่าน)
หมายเหตุ: อาจต้องรอสักครู่ (ประมาณ 30–60 วินาที) ให้ SonarQube ทำงานจนพร้อม หากเปิดหน้าเว็บแล้วยังโหลดไม่ขึ้น ให้รีเฟรชอีกครั้งหลังรอสักพัก
สร้างโปรเจกต์ใน SonarQube
- Create Project
- เลือก Manually
- ใส่ชื่อโปรเจกต์และ Project Key (เช่น simple-api)
- เลือก Locally สำหรับวิธีการวิเคราะห์
- กด Generate Token แล้ว คัดลอก token ไว้ (ใช้กับ sonar-scanner)
- กด Continue
สร้างไฟล์ sonar-project.properties
sonar.projectKey=simple-api
sonar.sources=.
sonar.host.url=http://sonarqube:9000
sonar.token=sqp_3c88208399bfcd77f8b21f50a0a70975aeb70214

sonar.tests=__tests__/
sonar.test.inclusions=**/*.test.js,**/*.spec.js
sonar.javascript.lcov.reportPaths=coverage/lcov.info
sonar.exclusions=coverage/**,node_modules/**
- sonar.projectKey : ใช้ตรงกับชื่อโปรเจกต์ใน SonarQube
- sonar.host.url : URL ของ SonarQube (ถ้าใช้ใน Docker Compose ชี้ไปที่ sonarqube:9000)
- sonar.token : Token ที่ได้จากขั้นตอนก่อนหน้า
- sonar.sources : โฟลเดอร์ที่มี source code
- sonar.tests : โฟลเดอร์ที่เก็บ test
- lcov.reportPaths : ตำแหน่งไฟล์ coverage ที่ Jest สร้าง
- sonar.exclusions : ไฟล์/โฟลเดอร์ที่ไม่ต้องสแกน
เริ่มสแกนโค้ดด้วย SonarQube
เมื่อทุกอย่างพร้อมแล้ว ทั้งโปรเจกต์, unit test, coverage และไฟล์ sonar-project.properties
เราสามารถสั่งสแกนได้ทันที
docker compose run --rm sonar-scanner
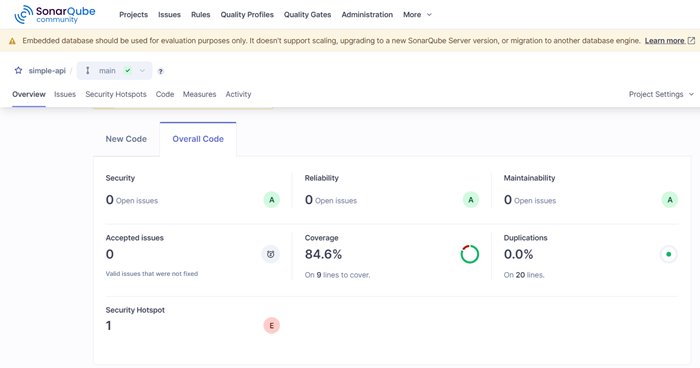
ถ้าทุกอย่างถูกต้อง จะเห็นผลลัพธ์ในหน้า SonarQube Dashboard
- รายงาน Test Coverage จาก Jest
- ตรวจเจอ Code Smells, Bugs และ Duplications (ถ้ามี)
- สถานะ Quality Gate บอกว่าโปรเจกต์ผ่านเกณฑ์คุณภาพหรือไม่
สรุป
- ตั้งค่า SonarQube แบบ Local ด้วย Docker
- ใช้โปรเจกต์ Node.js ที่มี unit test และ coverage report
- สร้างโปรเจกต์และ token ใน SonarQube
- เขียนไฟล์
sonar-project.propertiesเพื่อกำหนดการสแกน - รันคำสั่ง
sonar-scannerเพื่อสแกนโค้ด - ดูรายงานผลผ่านเว็บ SonarQube เพื่อประเมินคุณภาพโค้ด
แม้ว่าเราอาจไม่สามารถเขียนโค้ดที่สมบูรณ์แบบได้ทุกครั้ง แต่การรู้ว่าจุดไหนในโค้ดที่ควรปรับปรุง
จะช่วยให้เราก้าวหน้าและพัฒนาโปรเจกต์ได้อย่างยั่งยืนในระยะยาว 🙂